I’m never thrilled about posting bug-swatting info on this blog; the blog is (among other things) a temporal snapshot of what’s going on in X-Plane, as well as an archive; it’s my hope that we’ll get this problem sorted out soon, at which point this blog post will do nothing but confuse. But I digress.
There have been a number of reports from users of the sim hanging on startup with this configuration:
- A 64-bit Windows (usually Vista or 7).
- A modern ATI card running Catalyst 10-6 or 10-7 drivers.
- X-Plane 9.62rc2.
- Usually a core i7 type system.
However, I haven’t been able to reproduce this, and neither has ATI.
I don’t know what the problem is, but a number of variables have changed in this equation that need to be isolated: new sim, new video drivers, newer operating systems.
So if you have this configuration and can’t run the sim, despite removing all third party add-ons, please download this time demo. If you can run the 945 time demo but cannot run 962, please let me know by email, and we’ll isolate a defect in the sim. I have heard from some users that they can run 940, but no confirmation that 945 runs.
A quick thought on procedural vs. algorithmic scenery: there was some discussion on the X-Plane dev list about procedural terrain; the Outerra screen shots have stirred up interest.
There is a fundamental difference between what you see with Outerra and what we do with our global scenery:
- Typically procedural scenery is based on the idea of ‘amplifying data’ – that is, making a little bit of data look more interesting by applying a recursive algorithm to “generate” detail.
- Algorithmic scenery involves taking a large amount of unique input data and translating it; the detail comes from not losing information in the source data.
The key difference is whether the resulting scenery comes from a process that “creates” information through a ‘procedure’ or “translates” information.
Our scenery process does a bit of both, but we are more in the algorithmic camp than procedural camp; the global scenery is produced from hundreds of GB of input data, and we are constantly looking for better input data to create more interesting and accurate output scenery.
In fact, I would say that we are becoming more algorithmic and less procedural. In version 9, the urban roads in non-US cities are “procedural” – an algorithm generates them from the terrain data, an algorithm, and some random noise. For version 10, we are importing OSM.
One thing I have noticed in the work on version 10 global scenery is that we’ve finally crossed a line. With version 9, the question was ‘what is the best data we can get’. With version 9, the question is ‘how much information can we keep’; we’ve reached a point where the resolution of our input data is so much higher than what can go on DVD, that it’s a question of filtering down, not synthesizing up the resolution.
I have updated some of the facade documentation on the wiki with new performance tips for using facades.
A few quick notes:
- Your facades must be counter-clockwise (when viewed from above). Do not repeat the first point; X-Plane will “close” your building for you. (A four sided building should have four points, not five.)
- If you turn off two-sided facade drawing and your walls look wrong (and your roof disappears) your facade is wound in the wrong direction.
The performance tips go into a fair amount of detail about saving memory. Most of X-Plane’s rendering fall into two categories:
- Shared meshes (objects), where the geometry of the object is saved once and used lots of times. Objects usually hurt frame-rate by consuming CPU time, because for each drawing of the object, we have to do some setup to draw that shared geometry in a different location. (Version ten should feature some major improvements in object efficiency.)
- Non-shared meshes (everything else), where every single “instance” of a tree, facade, forest, etc. is uniquely constructed in memory. Non-shared messages are very fast (because we can submit a huge pile of non-shared messages to the video card in one shot) but they consume a lot of memory (because we pay for RAM per building/tree, not just once). Typically non-shared meshes are limited by virtual address space, not by framerate.
Facades are non-shared meshes, so the performance tips focus on how to limit the amount of RAM needed to represent your facade.
This is a feature I looked at putting into X-Plane 9, but it turned out that it affects so many different parts of the sim (and has to be done all-or-nothing) that it got kicked to v10. Consider these two pictures of the default B777 (the lighting was not adjusted, only the time of day):
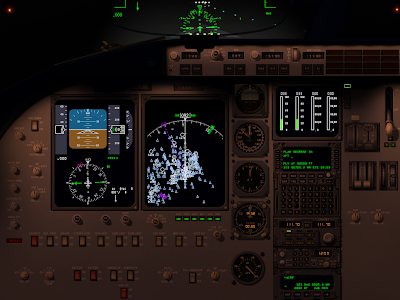
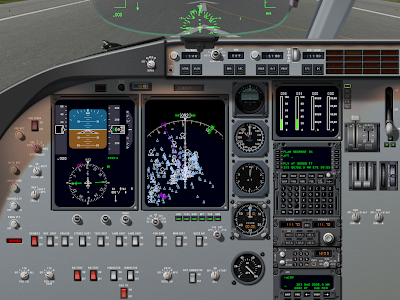
The night image looks pretty, but what’s wrong with the day image? The answer is: the small panel post lights in the night image are still casting a fair amount of light in the day image. And the result looks silly. But why?
The answer is: in real life your pupils would contract in the sun, letting in less light. The sun is really rather bright, so the daytime panel would still look normal, but the apparent power of those posts lights would be a lot less, because your eyes are less sensitive. In other words, the relative strength of the sun and post lights is wrong in the second image.
Computer monitors don’t have a huge dynamic range for how much brightness they can put out. So we can’t hope to display the absolute brightness of the scene correctly. Instead we need to make everything brighter at night (to simulate your night vision) and dimmer during the day, like this:
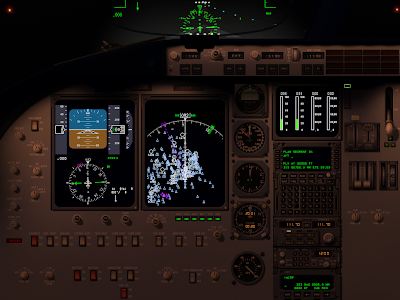
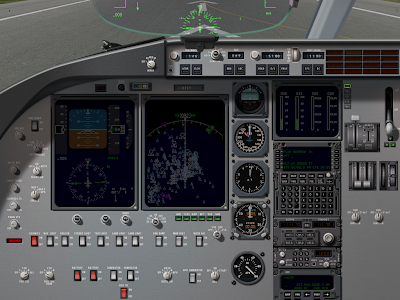
In this set of images, the night image is matched precisely to the previous one, but as the sun comes out, the apparent brightness of all lit textures has been scaled down to simulate the effect of your eye becoming less sensitive due to the flood of sunlight.
What’s good about the compensated image is that the weird artifacts from the post lights are gone; the relative strength of the post lights is really low in relative terms.
What happened to the EFIS and moving map? The answer is that they too are not as apparently bright relative to the sun as they would be at night.
There is one hitch here: plenty of real airplanes have light sensors for various avionics; the avionics will automatically turn up their brightness during the day. So it is possible (I am no expert on the 777) that in the real plane, as the sun rises, you might not have to adjust your instrument brightness; the sensor would do it for you. The pictures above illustrate what you would see if no automatic adjustment is made.
Auto-adjustment presents a challenge: currently two wrongs make a right. We don’t auto-adjust the brightness of instruments, but we don’t simulate the apparent visual brightness relative to the sun, and the result are instruments that look adequately bright at all times of day without user adjustment.
I think in the productized version of this feature, authors will have two options for anything lit:
- Tie the lit instrument/texture to an auto-adjusting rheostat (e.g. brightness 1 + auto adjustment) or
- Tie the lit instrument to the “raw” rheostat (e.g. brightness 1).
The tricky part will be finding the right mapping for legacy airplanes into the new system.
I sometimes get questions from authors considering how much to rely on a 2-d panel mapped to 3-d via the panel texture vs. a true 3-d panel. I can’t comment on what will look best, but I can comment on the relative performance characteristics of both techniques, and the answer might surprise you: in some cases you’ll get better performance by modeling directly in 3-d.
The 2-D Way
When you use the panel texture to make an object, X-Plane goes through a lot of steps to create the final result:
- Your panel has to be rendered in 2-d. We atlas your panel textures, but we don’t necessarily order them optimally – we don’t know the optimal order. Each generic instrument is at least one batch, perhaps even two. Those batches have very low vertex count, and the vertices are stored non-optimally on the CPU. There may be a fair number of texture changes between instruments.
- If you use ATTR_cockpit_region, we then go back and do the same thing…again! Why? Well, we need your panel’s raw color (“albedo” to graphics nerds) and the emissive light given off by anything self-lit separately, so that we can do correct 3-d lighting.
- Both of these are rendered to an off-screen texture that the video driver will feeel obligated to preserve at all costs, putting pressure on VRAM.
- Only when all that is done do we begin drawing your object, with the usual batches to change to panel texture and change back, perform animations, etc.
If this seems expensive, that’s because it is. Periodically users send me airplanes to look at their performance, and lately I’ve been seeing a lot more problems with 2-d panels (that fuel 3-d cockpits) being the performance bottleneck, not the 3-d modeling itself.
The 3-d Way
What if we want to go 3-d? Well, we’re going to “eat” a lot more of what your 3-d pit already has:
- You’ll need a lot more animations to move all of those parts.
- You’ll need new batches with ATTR_lit_level to dial up and down various lighting levels.
But you do get some advantages:
- Geometry in objects is processed about as optimally as we possibly can. All of that work we’ve done on the rendering engine to make OBJs fast is available in your cockpit. So you can increase 3-d detail ‘for free’.
- Your lit geometry can be drawn in a single pass (we don’t need to prepare two separate lit textures). So for example a needle would take three batches via the panel-texture route (a batch to rotate the needle for albedo, a second batch to draw the rotated night needle, and a third batch to draw the resulting texture in 3-d) but only one if you use the OBJ directly.
- Since you organize your textures for OBJs, you can guarantee that all of the cockpit stuff is together, saving texture thrash.
- You can use normal maps to add per pixel detail to your cockpit; panel textured geometry cannot be normal mapped.
A Balancing Act
Given the high cost of panel texture relative to native OBJ drawing, you’d think going native OBJ would be a no-brainer, right? Well, not quite.
A needle is an easy case: you can model a needle using a rotation animation, so your implementation in an OBJ and our generic instrument are quite similar. Same with the throttle lever generic instrument.
But what about a “glass pie indicator”? What about a moving map? What about a rotary?
There are some generic instruments that have “movement” for which there is no equivalent OBJ technique. With these generics, the generic instrument/panel code may be able to render the generic quite a bit more directly than your OBJ can simulate the same effect.
This is my suggestion on a cut-off: if you can directly model a generic instrument with an OBJ (needles, throttles, and other “simple moving things”), consider 3-d. If you would have to use a lot of extra texture space, copies of your mesh, or a lot of show-hides, use the panel texture.
Your goal should not be to eliminate the use of panel texture. But if you can cut panel texture down to a single 1024 x 1024 region from a larger area, you’ll probably see a performance win or a reduction in your airplane’s system requirements.
Performance Test First
Final thought: before you invest months in a complex cockpit design, mock up the “work-load” X-Plane must do and performance test it! For an OBJ, simply make one moving instrument and duplicate the mesh to get the number of expected animations. For the panel, drag out a bunch of instruments, make custom textures and just paint junk into them with photoshop. The goal is to make X-Plane do the same amount of work as it will in the final version. Then fly your test panel on target computers and observe performance.
The short answer is: to save memory.
The cars and replay seem to be a case of damned-if-we-do, damned-if-we-don’t. If we don’t stop the cars and reverse them in replay, we get piles of bug reports. If we do try to replay the traffic, we get bug reports too.
The current implementation is a bit strange: when you replay traffic, the cars will go back a bit in time, but at some point they will just stop and refuse to reverse any more. What’s going on?
The answer is that the cars have the memory of a goldfish. They simply don’t remember where they came from. Each car knows what “link” it is on, and about when it got onto that link and how fast it is going. (A link is a single straight piece of road.) So when we go into replay, we can easily move the cars along their links as time goes forward and backward.
But when we reach a time earlier than when the car entered the current link, the car has know idea how it got there, so it is forced to stop.
This is a simple case of not wanting to burn four tons of memory on a feature that is mainly visual. To replay the cars, we would have to accumulate a history of every link a car has been on as it drives. For 20,000 cars and a sim that’s been running a while, that’s a lot of memory to burn just in case you happen to hit the replay button.
In fact it gets worse. The cars are kept in a data structure that tells us who needs to make a driving decision and when.* This structure is optimized for the cars moving forward in time. We’d have to make and maintain an entire second copy of this structure to move the cars backward; again burning CPU and memory while you fly just in case you might hit a replay.
So instead we just provide replay on the current link.
* Programming nerds: the cars are in a priority queue by time to next navigation decision. I consider this to be very clever.
Previously I blogged about the difference between integrated first person shooters (FPS) and flight simulators, and how these differences mean that FPS tend to adopt new graphics technology significantly ahead of flight simulators. One of the major differences is that a FPS often will have its content packaged with the rendering engine in a single, unified product, while a general purpose flight simulator is expected to cope with third party content.
The need to be a platform for external content doesn’t just impact our ability to optimize for “special cases” (e.g. we can’t assume anything about third party); it also puts more pressure on the rendering engine to be robust in the case of error.
X-Plane has low level and high level scenery abstractions.
- Low level: an OBJ is low level. You give us a textured mesh, and we draw it. We don’t process the mesh, we don’t interpret it, we just draw what you made in Blender, AC3D, etc.
- High level: a forest. You tell us the outline of the forest’s area and give us some trees and we fill in the forest, picking trees and placing them.
Now there is always the risk that third party content can look stupid. If you model an airplane and you use 4 quads for each engine, your airplane is going to look bad, and there’s nothing the rendering engine can do to fix that.
But with higher level abstractions, the problem is more subtle. If the input data to a high level abstraction has a problem, X-Plane’s rendering might look bad. But what constitutes a problem?
In the case of forests, if the polygonal area of a forest is too thin (along certain axes) we will fail to put any trees into the polygon. Exactly what represents too thin isn’t particularly well documented or even easy to measure. This is difficult for third parties, because they don’t have an explicit set of guidelines for “you will make the rendering engine grumpy if you do X.”
This is the kind of thing that, in an integrated FPS, is much easier to cope with. The art team tries a technique, and if it looks bad, they email the rendering engine coder. The coders then either fix the rendering engine or tell the artist “don’t do that”.
In our case, we need to be more robust in the case of input data problems because we can’t tell everyone who tries X-Plane “don’t do that”, particularly when the edge cases may change with rendering engine improvements. So whereas a rendering engine feature in an integrated FPS might be useful if it looks good when used in a few usage cases , a rendering engine feature in X-Plane is only useful when it looks good under most usage cases.
This is two pictures of “tilings” of OpenStreetMap for use in global scenery. I downloaded a OSM new planet extract about a month ago; in the 11 months since I last grabbed it, the data size has grown 56%! The new, larger file required some changes to my extracting code. After much debugging, I was able to see this in QGIS:
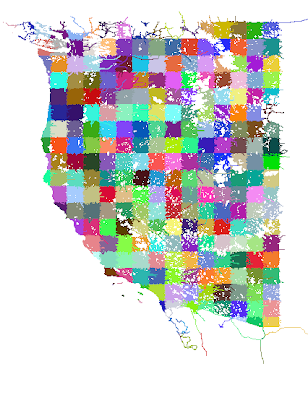
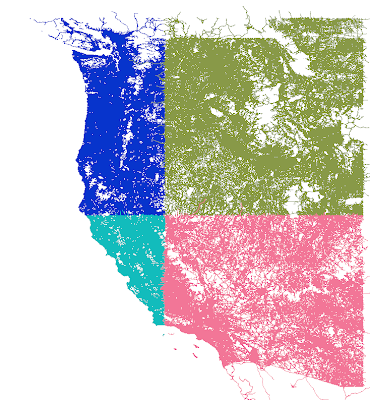
The first picture is 1×1 tiles, which are derived from the second picture (10x10s). You’ll see some “ragged” edges. This is because the cutting scheme leaves whole roads of interest in one piece even outside the tiling bounds. Later, more sophisticated code crops the road when the actual DSF is built.
The OSM processing tools are part of the open source scenery tools; I will get my changes checked in to source control over the next few days, although my code is only one of dozens of programs for bulk processing OSM.
I’ve been working on road processing today; one of the tricky problems with OSM data is that, because an OSM map is often a collection of vectors from separate authors, the results can be a huge number of very small segments, as nearby road features from different data sources cross each other. (Basically you get “thrash” between the two vectors from different sources and our tools solve this by adding a huge number of extra vertices.)
I am trying to run this data through an algorithm called Iterative Snap Rounding (ISR) to reduce this mess of vertices, and for the purpose of this blog article there’s one thing you need to know about ISR: it is really, really slow. So for the next few minutes, I figured I’d start poking at some of the issues that came up at the X-Plane Congress in France this summer.
One question that came up was whether/when X-Plane will go 64 bit. Here’s my current thinking:
We can’t drop 32-bit X-Plane. Too many users have a 32 bit operating system, or a 32-bit CPU. One thing I have been resisting for X-Plane 10 is a ratcheting up of the system requirements to only top-end game machines. While 64 bit is becoming more prevalent and has the potential to be a big win for users who load the sim up with third party add-ons and have a high-end graphics card, plenty of people buy a computer first and then discover X-Plane. Those users will often have a system that is low end (by X-Plane standards).
If we start cranking the system requirements (you have to have 64-bit, you have to have a DX10 class graphics card, you have to have 2 GB of RAM) then more users who might discover X-Plane won’t even be able to run the demo, and that will be bad for X-Plane’s growth.
So the question is not “when will we switch from 32-to-64 bit” – it is “when will we support both 32 and 64 bit.”
I think we will get there during the version 10 run, but I don’t think it’s that likely that we’ll ship 64 bit right out of the box. 64 bit is more of a performance enhancement* than a new feature. The features we have strong motivation to get into 10.0 are:
- Anything that raises the system requirements, because we don’t want to raise system requirements after we ship in a free update.
- Anything that enhances the authoring SDK, where it might be useful for authors to know that every version of X-Plane 10 has a feature.
- Of course, we want to ship any feature that looks really good and gets people excited.
- Foundation features that support other featuers have to go in first. So some enhancements that will ship in 10.0 are there because without them other tech couldn’t be rolled out.
64 bit is important, but it is a feature that only helps some of the user base, and helps by making the sim more expandable; the sim is still usable without it. So we’ll get there, but new features are a zero sum game so I think 64 bit is more likely to be a free patch than in-the-box.
(At this point I expect the various 64-bit OS users who have been asking for a 64-bit app for years to flame the heck out of me and point out that I am a cranky old bastard who doesn’t realize that 64 bit is now everywhere and totally pervasive and that this is therefore the most important thing we could possibly do. Before you dig in, hang on one second, let me put on my asbestos flame-retardant jacket. Okay…fire away. 🙂
Oops…ISR just finished…with a seg fault. Gotta go!
* As a performance enhancement, 64 bit is a weird one; because a 64-bit app uses more memory for pointer-based structures, the same data structures become larger, thrashing on-chip caches more. The real benefit to 64 bits is to allow X-Plane to use more than 3 GB of physical RAM.
To put it mildly, I am buried. If you have emailed me in the last few weeks, I apologize, but basically whatever is going on, I can’t look at it for at least a few more weeks. The four posts for June is an indication of work-load. In particular, since a lot of what I am working on is v10, it is under the radar until we do some kind of more formal announcements.
I did find a little bit of time last night to fix a MeshTool bug (thanks to the users who found this – it was a tricky one!). There will be a MeshTool RC2 to fix the bug: if you use only “wet” orthophotos (that is, orthophotos that have water-like physics) but not “dry” ones, the orthophotos are not exported at all.
I realize that the entire schema for creating mixed wet/dry orthophotos in MeshTool is byzantine at best. Basically you have to manually build the set of GIS files to create this effect, and even with examples in the README it is still pretty hard to do. I hope to automate this a bit in a future version of MeshTool but for now I need to finish version 2.0 as is. I’ll try to cut a new RC within the week.
Also a slight side note: MeshTool contains some hidden commands to let you build road grids inside MeshTool. This was never documented or supported; the code came from a merge of Andrew McGreggor’s work on New Zealand. Starting with RC2, exporting roads will simply not do anything.
The problem is that I did not separate MeshTool from the rest of the scenery code, and the rest of the scenery code is transitioning toward version 10 roads (which do you no good now as v10 isn’t released). If you are successfully using the hidden road code in MeshTool, email me and I can advise you on how to cut your own build. If you are trying to use the hidden road code but not succeeding, please use another tool like Jonathan Harris’ XPOSM.
In the long term we will end up with “draped” roads in overlays – that is, roads that do not depend on the shape of the mesh. Thus you will be able to simply write road data into an overlay file (or someday draw it in WorldEditor). But we’re not there yet.
Tyler has made a lot of progress moving the scenery documentation to the wiki. Once I find some time to give him more feedback we will be able to complete this process. Hopefully this will make it easier to keep the documentation updated.


